This year, I'm going to try out ultralight (UL) backpacking. My current pack base weight is about 30-35 lbs. (which isn't really that heavy). So to knock off 15 lbs. will be quite a challenge, but after carrying 60 lbs. of other peoples junk for a week in the Wind Rivers last summer, I'm committed to never repeat that experience again. There are a lot of ways I plan to cut weight that will require some DIY skills, so I'll keep you all posted.
My first area I'm attempting to cut weight is in cooking. Until now I've carried the following:
- Stove: MSR Superfly - Weight: 189 g
- Fuel: MSR Isopro fuel canister - Weight: 393 g (to boil 15 L)
- Pot: Similar to Stansport Solo 2 - Weight: approx. 225 g
- Plate: Marie Calendar's Pie Tin - Weight: approx. 25g
- Spoon: Old metal spoon - Weight: approx. 30 g
- Wind Screen: Weight: approx 10 g
- Cup: Plastic camp cup - Weight: approx. 45 g
- Fish Grill: Weight: approx. 50 g
It seems that all the cool UL through hikers are convinced that alcohol stoves are the way to go. There are a lot of different designs that are super easy for making an alcohol stove and the best resource I found for this is here: http://zenstoves.net/
I made the following stoves:
 | ||
| From Left to Right: Basic Top Burner, Mushroom Can, Basic Side Burner, Arizona Hybrid, Not pictured: open flame, Super Cat |
After reading about the various options, I chose to first make the Basic Top Burner. I didn't follow the instructions very carefully and I ended up with a tear down the outside of the stove and a lot of JB weld all over the thing. I found that JB weld does not work well for these alcohol stoves because it becomes very brittle, and it really, really, really stinks when burned. The little stove weighs next to nothing and functioned very well even out in freezing temperatures. This stove should require a priming pan, but I could get it to light by just dripping some fuel all over it and torching the whole thing. It took about 12 minutes to boil the same pot of water.
The first stove was a little complex so I decided to try something similar to the Super Cat and punched holes in a mushroom can in a similar fashion. This stove did not work at all. The metal of the can was too thick and the fuel inside did not stay hot while lit and quickly went out.
I also tried making a Super Cat stove that I've heard so much about from famous hikers. Similar to my mushroom can stove, I could not get it to stay lit in the cold. I also broke my hole punch and my holes were not very clean cut. I don't know how that would affect the stoves performance, but I felt that the design of punching a bunch of big holes in a can and calling it good was not very effective.
I went back to the soda cans because they are so light. This time I thought I'd get a wider, more stable base and used the 23 oz. Arizona drink cans instead of the regular 12 oz. soda can. This time I also followed the instructions from zenstoves for the Basic Side Burner stove. On the website it claims that no primer pan is needed since the side burners will heat up the fuel as the flames lick the side of the stove. This was not the case. I had to set the stove in a pan with fuel to get the burners to light. Once lit, however, the stove worked like a dream. I boiled the same pot of water in under 10 min. In an attempt to reduce weight and space further, as you can see, I made the stove a lot shorter than in the instructions. This would have been awesome, but I could only get about 3 tbsp of fuel in the stove which was barely enough to bring the pot of water to a very low boil.
My final design also used the wider Arizona cans. I made it a little taller to hold more than enough fuel, I put the side burners as high up on the sides as possible, and also used a 1/16 in. drill bit for bigger burners and a hotter flame. I also used an unopened can top to hold the fuel and JB welded it to another can bottom for a permanent primer pan. The permanent primer pan allowed me to be more exact with how much fuel I needed to use to get the burners lit. I did not test this stove with the same pot of water, but I was able to boil 750 mL of cold water in the aluminum pot pictured above in about 6 min. using roughly 4 tbsp of fuel.
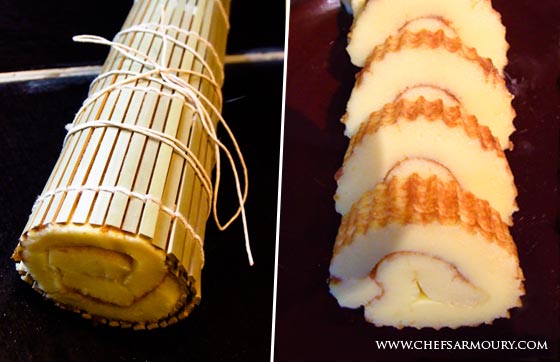
I found the aluminum pot at a second hand store for $.75. I gave it a little sanding and buffing and added a handle and it works great. The sloped shape allows the pot to pick up more heat from the stove as well.
So, to cut weight in the cooking area I will use the following:
- Stove: Arizona Hybrid - Weight: approx. 20 g
- Fuel: Denatured Alcohol - Weight: 935 g (to boil 15 L), or 327 g (to boil 7 meals)
- Pot: Aluminum Urn - Weight: 120 g
- Plate: not necessary - I'll eat out of the pot
- Spoon: Plastic Spoon - 5 gWeight: approx. 50 g
- Wind Screen: Weight: approx 10 g
- Cup: not necessary - I'll drink from my water bottle
- Fish Grill: not necessary - unless I'm planning on doing a lot of fishing
A difference of 50%!
The big advantage seems to be that with the alcohol stove, you only carry what you need. My MSR stove is great and if I'm traveling with a group and need to boil 2 L a meal, it is by far the better way to go, but if I'm not carrying anyone else's crap, the alcohol stove wins for trips under a week long. I suppose it might even win out for very long trips because you won't have empty canisters to pack out.
This project was a success. I managed to pinch my thumb with pliers, slice it and puncture it with sharp aluminum, engulf it in burning alcohol, and scrape it with sand paper. Ouch.